Installation - Web Server (IIS)
As Keyfax 3.2 runs as a web service, it is necessary to install the Keyfax 3.2 application on a Windows 2000 or Windows 2003 Server, which is running Internet Information Services (IIS). The steps involved are described below.
Installation checklist
This is a summary of the steps required in setting up your IIS Server:
- Create base folder (KeyfaxData)
- Deploy files
- Create shares
- Assign permission to folders and shares
- Create and configure virtual folders
- Setup Keyfax configuration files
- Register DLLs
- Run Test Page
Deploying files to the server
The following folders from the supplied CD or ZIP file need copying to the IIS server:
- Keyfax32
- KFc32
- KFlauncher
- KFprivate (create an empty folder if not supplied)
- KFresources (as above)
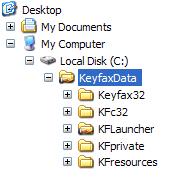
To keep all the folders together and to assist with giving permissions to allow IIS and DLLs to read the files we recommend these are all placed in a parent 'KeyfaxData' folder.
Therefore the folder structure should look something like the following:
Shares & Permissions
The KeyfaxData and KFlauncher folders should be shared (as the default names 'KeyfaxData' and 'KFlauncher' - Note that these may be hidden shares, i.e. 'KeyfaxData$' and 'KFlauncher$')
The shares and physical folders should
be granted read permissions for the IUSR_SERVERNAME account.
In addition, the KFlauncher folder should have write/modify permissions for users who need access to Keyfax configuration via the Keyfax Administration Console (KFadmin.exe is a Win32 client PC application, which manages the Keyfax script database).
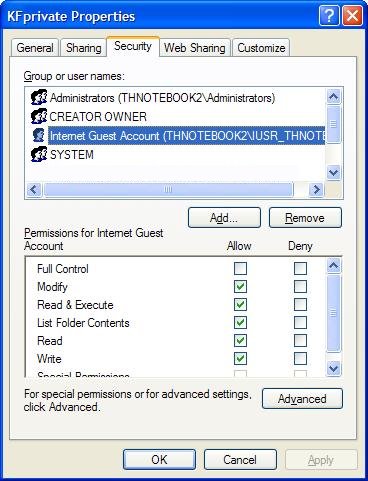
The KFprivate and KFresources folders should have permissions for the IUSR_SERVERNAME account as the screen capture below indicates. This will allow Keyfax to save the export XML data to a file in this KFlauncher folder if launched from its test 'debug' environment, and allow administrators to add resource files to the Keyfax task environment.
IIS Virtual Folders
In most cases the Keyfax folders can be created directly under the C:\inetpub\wwwroot folder of the IIS Server, in this case it is not always required to create an IIS 'Virtual Directory'. However, we ALWAYS recommend that IIS 'Virtual Folders' are created for the Keyfax folders, pointing at the chosen Windows 2000-3 Server locations.
For detailed explanation of how to set up IIS 'Virtual Folders' please refer to Microsoft IIS documentation.
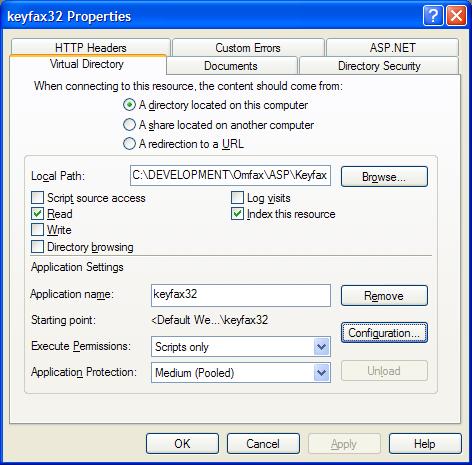
The following Virtual Directories should be set-up under the server's 'Default Web Site' using the IIS plug-in for the Microsoft Management Console (important: please ensure all virtual folder names are in lower case):
- keyfax32
- Virtual Directory Alias: Keyfax32
- Web Site Content Directory: [physical Keyfax32 folder path]
- Access Permissions: 'Read' and 'Run Scripts'
- kfc32
- Virtual Directory Alias: KFc32
- Web Site Content Directory: [physical KFc32 folder path]
- Access Permissions: 'Read' and 'Run Scripts'
- kflauncher
- Virtual Directory Alias: KFlauncher
- Web Site Content Directory: [physical KFlauncher folder path]
- Access Permissions: Default
- kfprivate
- Virtual Directory Alias: KFprivate
- Web Site Content Directory: [physical KFprivate folder path]
- Access Permissions: Default
- kfresources
- Virtual Directory Alias: KFresources
- Web Site Content Directory: [physical KFresources folder path]
- Access Permissions: Default
The keyfax32 and kfc32 virtual folders should have the additional properties set as follows:
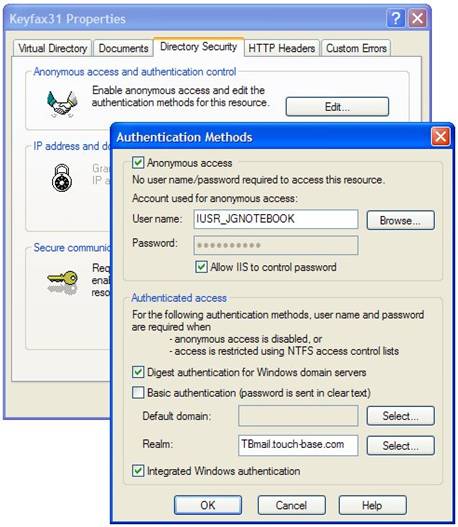
- Anonymous Access Authentication: Should be enabled for the IUSR_SERVERNAME account.
see screen capture below:
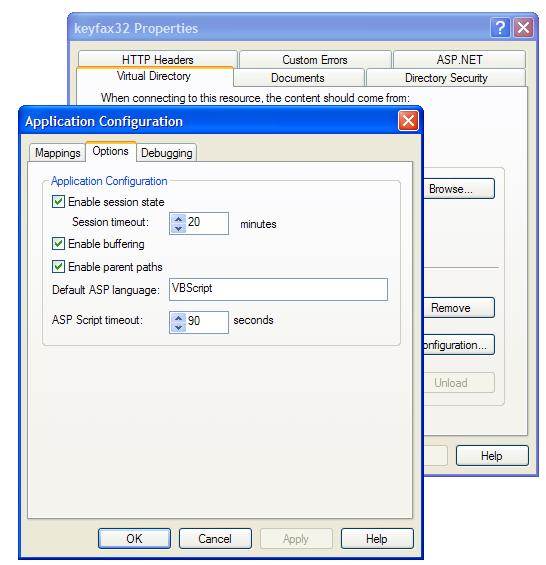
- Enable parent paths: These must be switched on under the Application Configuration's Access tab. This will allow the main Keyfax32 and KFc32 ASP files to access the configuration settings in the KFlauncher virtual folder and write output to the private virtual folder.
see the screen capture below:
- Log visits : This should be switched off, i.e. unchecked. If left switched on, without housekeeping, logs can soon occupy vast amounts of hard disk storage:
In addition, if IIS version 6.0 is used (Windows 2003 Server), Active Server Pages should be allowed under Web Service Extensions.
See the screen capture below:

Note: For more information on creating Virtual Directories, applying security settings or any other IIS configuration issues, please consult Microsoft IIS documentation
Keyfax configuration file (KF_config.xml)
Keyfax 3.2 has various configuration settings, which are stored in an initialisation file (KF_config.xml - Note: the KF prefix may be replaced with a company name or abreviation); which is located in the shared KFlauncher folder on the IIS server. This XML file contains the Database connection details and site specific configuration details which the Keyfax 3.2 application uses at run-time.
During installation an Omfax representative may have pre configured the necessary settings for initial usage. This will include the database connection settings (see database settings).
Note: Full setting descriptions can be found in the settings section.
This XML file can be edited using any XML or ASCII file editor, such as Microsoft notepad. The Keyfax service URLs and database connection settings can be modified to allow for the specific servers used for IIS and SQL Server at the customer site.
Note: It is advisable not to modify any other configuration settings, but to first consult an Omfax technician.
Technical Note: The Keyfax Administration Console uses settings held in an INI file (Keyfax32.ini) this file is also located in the KFlauncher folder.
To allow the Keyfax Administration Console to control these settings the path to the Keyfax32.ini file should be specified in the dialogue under the 'Connections/INI File Location' menu of the Keyfax Administration Console.
However, the Keyfax Administration Console is currently being re-written, and on release the Keyfax32.ini file will no longer be required.
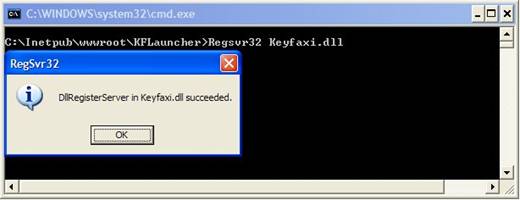
Keyfax Dynamic Link Libraries (keyfaxi32.dll, kfc32.dll & kfdxml.dll)
Keyfax 3.2 encapsulates the majority of its business logic and functionality in three Dynamic Link Libraries (DLLs) which by default are located in the KFlauncher. These are named keyfaxi32.dll, Kfc32.dll and KFDXML.dll. These files are 'ActiveX' DLLs, so need registering at a command prompt with Regsvr32.exe (a Microsoft utility located in the System32 folder). See the following example:
- Regsvr32 C:\Inetpub\wwwroot\Kflauncher\Keyfaxi32.dll
- Regsvr32 C:\Inetpub\wwwroot\Kflauncher\Kfc32.dll
- Regsvr32 C:\Inetpub\wwwroot\Kflauncher\KFDXML.dll
If any of the Keyfax 3.2 DLLs needs replacing at any time the IIS Service is required to be restarted first.
This is most easily accomplished with the 'iisreset' command from a command prompt on the server. Once restarted, the DLL(s) can be re-registered as detailed above.
We have experienced some problems in the past, when the 'iisreset' command has resulted in the services not starting correctly afterwards.
This will result in 'Page not found' errors or similar, in the browser. To overcome, either run manually check for service state and start manually, or use the following DOS batch script instead of the 'iisreset' command:
  @echo off
  net stop iisadmin /y
  net start iisadmin
  net start w3svc
  net start "FTP Publishing Service"
Note: It is recommended to apply file changes at such a time when users are not using the applications running on the IIS Server, as this would cause them to potentially loose information or current session state. Omfax Systems Ltd cannot be held liable to information lost in other applications when the IIS Server is restarted when this recommendation is not followed.
It is important that these DLLs have 'Read' & 'Execute' permissions for the IUSR_SERVERNAME account.
Note: Omfax Systems Ltd are aware of situations when the permissions for this file have been removed by Microsoft security utilities designed to clean up security holes under Windows IIS folders or Virtual Directories (i.e. Microsoft Front Page server extensions 2002 server heath check and repair utility). If this occurs an error message may be displayed that the IIS Service cannot create the object 'Keyfaxi32.cHTML'. This is remedied by re-applying the permissions for the DLLs.
Keyfax test page (Browser)
Keyfax 3.2 has a test page which when configured can be used to test the launching and results from Keyfax Repair Diagnostic scripts. This is via a file in a sub folder of the Keyfax application.
In order to configure this test page, it is necessary to modify a configuration file to change the name of the IIS Server to that which the Keyfax31 application runs.
Open the following file in Microsoft Notepad to make the changes:
- \\[KEYFAX32 physical path]\test\config.asp
Change the following constants to valid URLs:
Const WEB_SERVICE_CREATE_URL = "http://[IIS_SERVER_NAME]/keyfax31/startup.asp"
Const WEB_SERVICE_STARTUP_URL = "http://[IIS_SERVER_NAME]/keyfax31/ws_login.asp"
Const RETURN_URL = "http://[IIS_SERVER_NAME]/keyfax31/test/response.asp"
Const WEB_SERVICE_STATUS_URL = "http://[IIS_SERVER_NAME]/keyfax31/status.asp"
Replace [IIS_SERVER_NAME] (or the server name currently set) with the customer's IIS Server name i.e. INTRANET1.
Keyfax can then be tested from any Internet Explorer 6.0 browser by navigating to the following URL:
- http://IIS_SERVER_NAME/keyfax32/test/
- A page will be displayed with variable settings which can be passed to Keyfax 3.2.
- Clicking 'Submit' will launch Keyfax 3.2 in the lower frame.
- After a Repair Diagnostic or Frontline script is completed, the repair can be submitted.
- The lower frame is replaces with the results from Keyfax and the contents of the returned XML results in the lower pane.
- Any errors will be displayed on screen for Omfax technician's debug use.
- The resulting Export.xml data will be saved to file in the Keyfax 'KFprivate' folder (See IIS Virtual folders) for debug use.